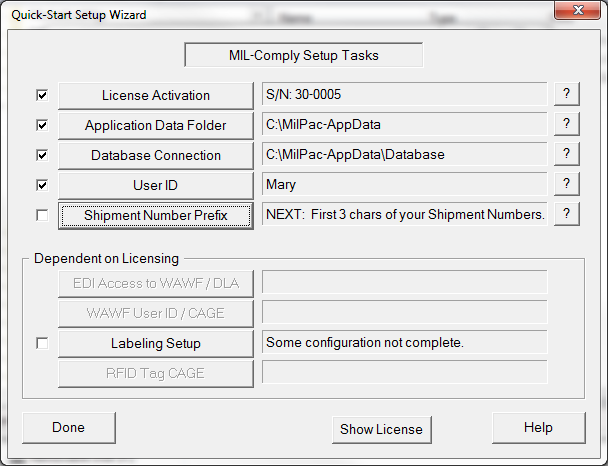
The process will step through the configuration process, checking off tasks as completed. Tasks which are dim and lack a check box are not applicable to your license features.
The Setup Wizard focuses on these essential configuration items:
License Activation
Your MIL-Comply serial number and licensed features are established by entering the Activation Key provided to you by Mil-Pac or your company's MIL-Comply license administrator. For those installing the software from a distribution CD this step may already be complete. Click on [License Activation] to enter your Activation Key in the License Activation dialog.
Application Data Folder (ADF)
MIL-Comply primarily stores shipment data in a database. Other incidental data, such as export files, WAWF transactions, database backup files, etc., is stored in a collection of folders. These folders resided in the Application Data Folder (ADF). By default, the MIL-Comply database also resides in the ADF. Its location can be controlled through the Database Location dialog.
Database Location / Connection
For a database, MIL-Comply can use either a desktop database (Paradox), SQL Express, or SQL Server. By default, the database is created in the Database folder that MIL-Comply creates in the Application Data Folder. During this step you can accept this location or select a different one. You may also connect to a MS SQL Server database. Note that this requires the pre-configuration of the Data Source (DSN) in the PC's ODBC Administrator. Read more about configuring a Database Location.
User ID
MIL-Comply employs a simple User ID to differentiate users from each other when more than a one user shares a database. This keeps configuration details separate. In single user installations this is simply a formality.
The User ID may be up to twelve (12) characters, without spaces or special characters. It does not have to relate to your Windows login or any other ID. During this setup task the User Login Dialog will be used to establish the default User ID for this machine. In the process of doing this MIL-Comply will test the database connection.
Shipment Number Prefix
The Shipment Number Prefix is the first three characters at the start of a shipment number. E.g. it is the "XYZ" in shipment number "XYZ0001". Also set is the method of identifying shipments using Reference Numbers, which can be done manually or automatically by MIL-Comply. See Basic Setup in Configuration Elements.
EDI Access to WAWF / DLA
Users with a subscription to the Mil-Pac Value-Added Network (VAN) may send Receiving Reports, Invoices, RFID Updates, etc. to WAWF. The VAN may also used to receive EDI Purchase Order (EDI-850) transactions from DLA, as well as perform specialized transactions with the UID Registry. See EDI/VAN Setup in Configuration Elements.
WAWF User ID / CAGE
Provide your WAWF User ID and CAGE code for submitting EDI transactions to WAWF. See WAWF Translation in Configuration Elements.
Labeling Setup
Before printing labels some basic setup of Labeling should be done to simplify the process. This includes identifying the printer(s) to be used as well as the Ship From address for Military Standard Labels. See Basic Labeling Setup for details.
RFID Tag CAGE
The creation of RFID tags used on labels require a CAGE code and the next sequence number to be used. See the RFID Tag Sequence setup dialog.
