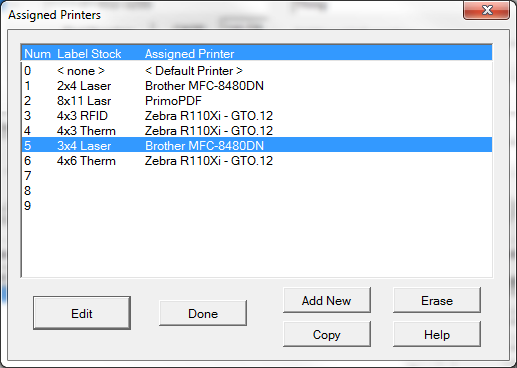
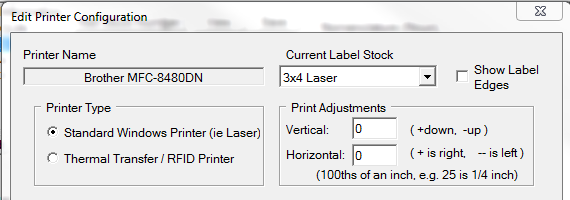
Labeling routes print jobs to the intended printer by the Label Stock selected on dialogs like the Container Label Editor. Printers are assigned label stocks in the Assigned Printers, which also maintains the configuration for each printer. For example, labels intended for 3x4 Laser stock will go to the Brother MFC printer, which is configured by the [ Edit ] button.
Label stocks define the layout of individual labels on the sheet/roll. In some cases they simply differentiate purpose. For example 4x3 Therm and 4x3 RFID are exactly the same as far as Labeling is concerned, but can be used to identify different printers, or to SPOOL label print jobs for those different stocks. More about label stocks.
Basic Printer Configuration
oStandard Windows Printer - means that your Windows printer driver handles all aspects of print rendering using its Graphics Device Interface. Labeling tells it what to print and the driver tells the printer how to do it.
oThermal Transfer / RFID Printer - means that Labeling will talk to your printer in its own printer language.
oCurrent Label Stock - identifies how print jobs are routed this printer setup
oShow Label Edges - causes a thin line to be drawn on the label sheet where Labeling thinks the die-cuts are. This is handy for adjusting the print positioning, or if you are using full sheet labels you can use the label edge lines to guide you in manually cutting the labels out.
oPrint Adjustments - affects how the label image is positioned on the label stock. Many printer drivers automatically create a 0.25-inch margin, which you can compensate for by setting both of the following to -25, moving the image back up and to the left by a quarter of an inch.
•Vertical - print image offset, in hundredths of an inch, with negative numbers moving the image up, positive numbers down.
•Horizontal - print image offset , in hundredths of an inch, with negative numbers moving the image to the left, positive numbers to the right.
Thermal-Transfer / RFID Printers
It is possible to operate thermal-transfer printers as standard Windows printers, as long as they are high resolution (300+ DPI (Dots per Inch)). However, better results are generally achieved when Labeling can control them with their native printer language. This is an absolute requirement for RFID labels.
To demonstrate configuring a printer, let's add a Zebra R110Xi (300 DPI) RFID printer:
1.Ensure that the printer is in shown in Windows under Devices and Printers (or equivalent for your PC)
a.If not, add it following the manufacturers instructions, and print a test page to ensure proper connectivity.
b.Use of the Generic Text Only driver is an alternative to use of the manufacturer's driver
2.[ Add New ] on the Assigned Printers Dialog (pictured at top)
3.Select the printer from the list of printers that will be displayed.
a.If the printer is not visible, try the (Network vs Local) option, and if still not visible seek IT assistance
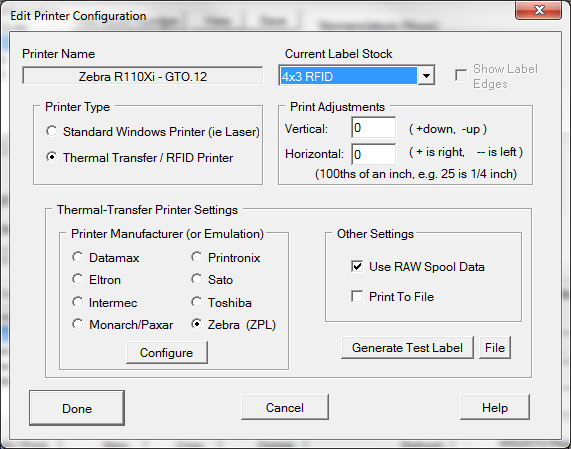
4.The Edit Printer Configuration dialog, at right, will be displayed
a.Select the Label Stock you intend to use (this can be easily changed later)
b.Select Thermal Transfer / RFID Printer
c.Skip Print Adjustments (described above in Basic Printer Configuration) for now
d.Select Zebra as the Printer Manufacturer in Thermal-Transfer Printer Settings
e.Printer family-specific configuration will pop up if necessary, which you can get back to via the [ Configure ] button. More information follows about this, but for now we would check the 300 DPI and X.10 settings.
5.You may [ Generate Test Label ] to see if the configuration is correct. There are not test labels for every stock type, particularly RFID. Try the "Therm" equivalent (4x3 Therm, in this case), remember to set the label stock back to RFID. Because RFID printers can be a little sensitive, testing can be a little tricky so it is a good idea to do initial testing with "Therm" formats to confirm basic operation before moving on to RFID. If the printer works with Labeling for standard labels it should with RFID as well. If not, it is likely a Firmware configuration mismatch or an RFID encoding / label stock mismatch.
|


