")
Tag Data Generator
(Initial State)
The RFID Manager Tag Data Generator allows users to create RFID records for shipments, suitable for submission to WAWF, without having to use Labeling to print them. This allows for a robust implementation of MIL-Comply, including WAWF EDI transactions, without the need to support RFID printing capabilities. The RFID data may be submitted as either a Pack Update or included in a Receiving Report submitted to WAWF by Shipper.
The step is to select the Tag Generator from the RFID Manager Tools menu. You will be asked to open a shipment that has been previously created in Shipper, Labeling or Contract Manager. A bare bones shipment is required to create a Pack Update. The shipment's CLINs are referenced by the RFID records created.
Bring up the Tag Generator with the command of the same name in RFID Manager Tools Menu. Then follow the following steps
Generating a Palletized RFID Shipment
1.Fill in the CLIN of the item for which RFID tag data is being generated, and the Unit of Issue, if convenient.
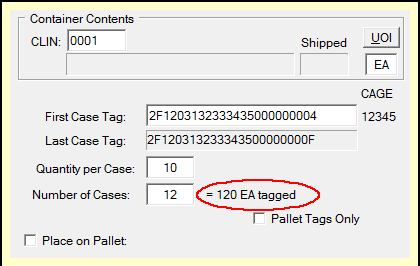
2.Fill in the first Case Tag to be recorded. If you have used the Generator before, the next tag will already filled-in. Notice that the tag's CAGE code is shown to the right of it; a little feedback that the tag has been entered correctly.
The next tag for a different CAGE can looked up by entering that CAGE in place of the Tag followed by the <Tab> key.
3.Enter the Quantity per Case, which is the number appearing on the containers being reported.
4.Enter the Number of Cases, when completed the software will tell you the number of items being tagged (and reported to WAWF). Unless there is a partial Case, this should match the quantity of the CLIN to be shipped. More about partial containers.
5.

Automatic Palletizing
Ignore Pallet Tags Only for the moment. That option is used for manually palletizing Cases.
6.If these Cases are going to palletized, and you have that tag ID, check Place on Pallet. That will auto-populate with the next Pallet Tag ID after the last one used. Otherwise, enter the pallet ID. Notice, like with the Case Tag, the tag's CAGE code is shown to the right of the tag to indicate it was entered correctly.
a.When the pallet option is used, you can auto-palletize, which is done in the example, with 4 cases

Load Summary
per pallet.
7.Finally, clicking [ Generate Tag Records ] will start inserting RFID records into the database, and while it is happening the RFID Tag Summary will show progress, with the result what we expected; 12 cases on 3 pallets, for a total of 120 pieces.
Partial Containers

Adding Partial Case
Just to complicate things, let say you also had a partial case, with 7 pieces in it. Easy enough, just click [ Next ] to add it.
1.Change the Quantity of Cases to 7.
2.Change the Number of Cases to 1; notice that it now reports "7 EA tagged".
3.The Tag Generator has advanced the Pallet ID to the next one to be used, which is fine if that's what you want to do, but it's more likely we want to put this remainder case on the last pallet. We could try changing the Pallet Number to 2F0...020003 with 1 Case per Pallet, but that will not work because it will want to create another pallet record. So...
a.

Final Summary
Turn off Auto-Palletize
b.Turn off Place on Pallet
4.Click [ Generate Tag Records ] to add the final Case Tag
The final summary looks like we expected. A total of 13 Cases for 127 pieces, with 3 pallets. However, we know that the last Case is not going to be on any pallets.

Loose Case
Placing Loose Cases on Pallet

Stacked Case
Putting the last case on its pallet is pretty easy. (Close the Tag Generator, and use the [ Browse ] button to open up the [ Container Browser ]. As expected Case 2F100010 is sitting alongside the pallets, rather than being in one of them. Since it is already selected, simply Rt-Clk & Put on a Pallet, then select 2F0...20003 from the list that pops up. It will "disappear", but if we click twice on the pallets [+] icon, we will see it sitting there.
With that the RFID data is ready to be sent to WAWF in a Receiving Report or as a Pack Update
Adding Pallet Tags Later
Pallet tags may be added in a separate operation by check Pallet Tags Only option. Then fill in the first Pallet Tag to be recorded. If you have used the Generator before, the next tag will already filled-in. Notice that the tag's CAGE code is shown to the right of it to ensure that the tag has been entered correctly. The next tag any CAGE can looked up by entering that CAGE in place of the Tag ID, followed by the <Tab> key. Then follow the Placing Loose Cases method above.
See Also: