Generalized configuration of the VSM Integration Library consists of three areas:
•Communications with the VSM Server
•Working area for temporary data files
•RFID labeling
This configuration can be done in either Comply/Labeling or Comply/Shipper, which have VSM Configuration as an option in their Tools Menu. It can be adjusted in the VSM Shipment Dashboard using the Options menu command found in the upper-left corner of that screen.
Scratch Transaction Folder
The VSM Integration generates transaction files prior to sending them, and records responses received from VSM in its Scratch Folder. If blank, use [Set] to pick a folder, preferably one that can be dedicated to VSM transactions. Make sure it is one that you have full access to. The files in this folder may be purged as needed without effecting the shipments stored in the database.
VSM Server Communications
•VSM Login - enter the User ID and Password used to access the VSM web site.
•Use Production VSM Server - should be checked. It may be possible to use VSM's test server for integration testing by making a request to the VSM Help Desk. Doing so requires that you manually load contracts into the server to ship against.
•VSM Web Services Driver - a special SOAP client that must be used for FOB Destination shipments. After installing the Web Services Driver use the [Set] button to locate it. It will generally be in C:\Program Files (x86)\Mil-Pac\VSM-WSClient.
Testing VSM Access
Once configuration of the above elements is complete you may test access to VSM. Refer to Testing VSM Access if there are problems.
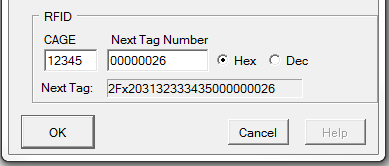
RFID Settings
The RFID settings are required are going to be printing labels with Radio Frequency Identification (RFID). These are the same settings found in Comply/Labeling, so they may already be populated. You may ignore them if RFID printing is not planned.
The CAGE and Next Tag Number are combined to create RFID that are allocated when printing RFID-enabled label formats. The sequence portion of the RFID is a nine-digit hexadecimal number (base 16). Leading zeroes are not required. The ID many also be entered in decimal (base 10) format, should that be more convenient for you. So if you want to start with tag number 1,000,001, click on Dec and then enter 1000001 (no commas). Labeling will convert that for you to 0000F4241.
You can also use the Dec button to determine the decimal equivalent of your next tag. The 12C in the example equates to 300. The use of hexadecimal by DoD is to allow for more IDs to be encoded with just the nine characters available. In fact, a total 68,719,476,736 unique IDs can be encoded with nine hex digits.
The CAGE is also encoded in hex, but in a special way. In the example, "1HLD9" is encoded as "2031484C4439". RFID tags will always start with "2F" and either a zero, one or two, depending on whether the tag is for a pallet, case or unit.
See also:

